I want there to be no peasant in my realm so poor that he will not have a chicken in his pot every Sunday.
King Henry IV of France
This just LOOKS like a law-haw-hawng recipe — but it’s absolutely the best roast chicken I’ve EVER had — SO worth the time — SO MAKE THIS!! My brother Mark is a master at this recipe and has adapted it to the barbecue for outdoor cooking which solves the need to have a super clean oven all the time in case you want to make this.
It’s really just 3 easy steps – Step 1, salting the chicken (CRITICAL!! Otherwise, you may as well not make it!); Step 2 roasting; Step 3 Bread salad and serving. I use the same dry brining method for our Thanksgiving turkey.
Adapted from the Zuni Cafe Cookbook
Serves 2 to 4
For ultimate flavor it’s best to salt the chicken the night before, but I’ve waited many times until the morning of the day I plan to cook this– give the chicken at least 8 hours to sit in the salt seasoning.
And finally – unless your oven is super super clean, I strongly suggest you use Mark’s method and cook this chicken in an oven-proof skillet ON the barbecue. I’ve learned from experience that the my kitchen will get smoky and I have to turn off my smoke alarms. Cooking this in the barbecue is simple, clean and keeps the smoke OUTSIDE.
STEP ONE – Salting the chicken:
Time: Active time — 10 minutes
Fridge time — From 8 hours minimum to 2 days maximum
Ingredients
One small chicken, 2 3/4 to 3 1/2-pounds (be sure to get a smaller sized bird)
4 tender sprigs fresh thyme, marjoram, rosemary or sage, about 1/2 inch long
3/4 teaspoon salt PER POUND OF CHICKEN
3/4 to 1 teaspoon freshly cracked black pepper
1 to 3 days before serving (I’ve done this often just the morning before I plan to roast the chicken), but I’d go for at least two days for the chicken to be truly spectacular!
Remove and discard the lump of fat inside the chicken. Rinse the chicken and pat very dry inside and out. Be thorough — a wet chicken will spend too much time steaming before it begins to turn golden brown.
Slide a finger under the skin of each of the breasts, making 2 little pockets. Now use the tip of your finger to gently loosen a pocket of skin on the outside of the thickest section of each thigh. Using your finger, shove an herb sprig into each of the 4 pockets.
Season the chicken liberally all over with salt and pepper. Season the thick sections a little more heavily than the skinny ankles and wings. Sprinkle a little of the salt just inside the cavity, on the backbone, but don’t otherwise worry about seasoning the inside. Twist and tuck the wing tips behind the shoulders. Cover loosely and refrigerate for at least 8 hours – and it’s better up to two days.
STEP TWO – Roasting the chicken:
Time: From 35 minutes to 55 minutes depending on the size of the chicken
Preheat the oven or barbecue to 475°F. Choose a shallow flameproof roasting pan or use a 10-inch skillet with an all-metal handle or cast iron pan. Preheat the pan over medium heat. Wipe the chicken dry and set it breast side up in the pan. It should sizzle.
Place the chicken in the pan in the center of the oven and listen and watch for it to start browning within 20 minutes. If it doesn’t, raise the temperature about 10 degrees at a time until it does. The skin should blister, but if the chicken begins to char, or the fat is smoking, reduce temperature by 25 degrees. After about 30 minutes, turn the bird over. Roast for another 10 to 20 minutes, depending on size, then flip back over to recrisp the breast skin, another 5 to 10 minutes. Adjust cooking times according to the size of chicken you use. Internal temperature should be 165 degrees F.
Rest the chicken: Remove the chicken from the oven and turn off the heat. Lift the chicken from the roasting pan and set on a plate. Carefully pour the clear fat from the roasting pan, leaving the lean drippings behind. Add about a tablespoon of water to the hot pan and swirl it.
Slash the stretched skin between the thighs and breasts of the chicken, then tilt the bird and plate over the roasting pan to drain the juice into the drippings. You can let it rest while you finish your side dishes (or Bread Salad, below). The meat will become more tender and juicy as it cools.
STEP THREE: Bread Salad
Zuni Chicken isn’t Zuni Chicken without this bread salad. I make bread croutons in the morning, and put the salad together while the chicken is resting.
Zuni Cafe Bread Salad
I can’t describe it any better than they do: “Sort of a scrappy extramural stuffing, it is a warm mix of crispy, tender, and chewy chunks of bread, a little slivered garlic and scallion, a scatter of currants and pine nuts, and a handful of greens, all moistened with vinaigrette and chicken drippings.”
Ingredients:
Generous 8 ounces slightly stale open-crumbed, chewy, peasant-style bread (not sourdough)
6 to 8 tablespoons mild-tasting olive oil
1 1/2 tablespoons Champagne vinegar or white wine vinegar
Salt and freshly cracked black pepper
1 tablespoon dried currants (I get them at Whole Foods) plumped in 1 tablespoon red wine vinegar and 1 tablespoon warm water for ten minutes or so
2 tablespoons pine nuts, toasted (I always use more)
2 to 3 garlic cloves,slivered
Chopped Italian parsley to taste 3-4 tablespoonsful
1/4 cup slivered scallions (about 4 scallions), including a little of the green part
2 tablespoons lightly salted chicken stock or lightly salted water
A few handfuls of arugula, washed and dried
Preheat the broiler. Carve off the crust from the bread (you can reserve these to use as croutons for soup or another salad). Tear bread into irregular 2- to 3-inch chunks,. You should get about 4 cups.
Toss them with just a tablespoon or two of olive oil, lightly coating them, and broil them very briefly, just to lightly color the edges.
Combine about 1/4 cup of the olive oil with the Champagne or white wine vinegar and salt and pepper to taste. Toss about 1/4 cup of this tart vinaigrette with the torn bread in a wide salad bowl; the bread will be unevenly dressed. Taste one of the more saturated pieces. If it is bland, add a little salt and pepper and toss again.
Heat a spoonful of the olive oil in a small skillet, add the garlic and scallions, and cook over medium-low heat, stirring constantly, until softened. Don’t let them color. Scrape into the bread and fold to combine. Drain the plumped currants and fold them in, along with the pine nuts. Dribble the chicken stock or lightly salted water over the salad and fold again.
Taste a few pieces of bread. If it is bland, add salt, pepper, and/or a few drops of vinegar, then toss well.
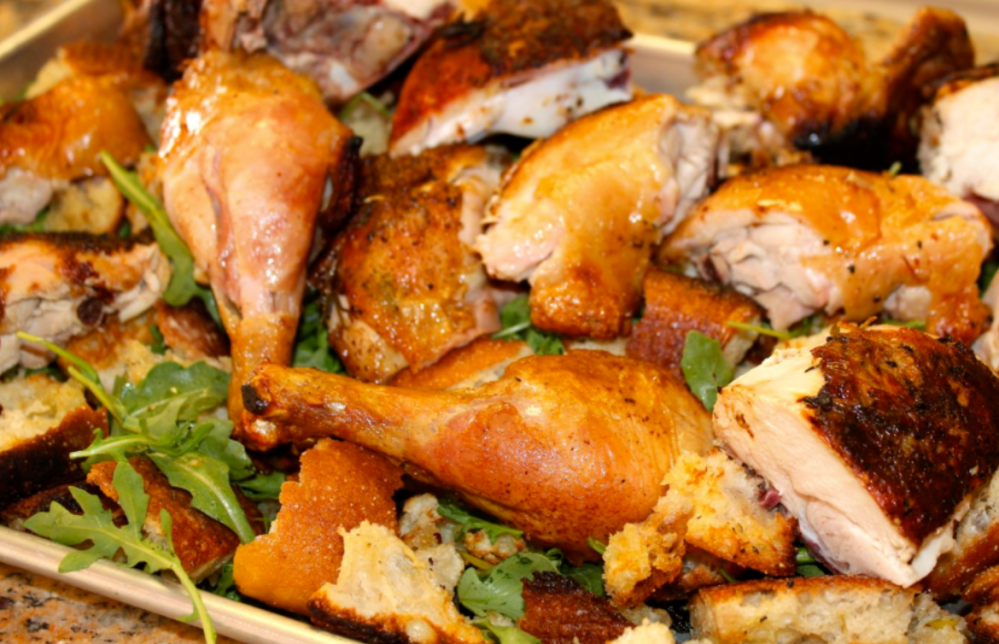
Serve the salad under the roast chicken. Pile the bread salad on the serving dish you want to use and tent it with foil.
Place the salad in the oven after you flip the chicken the final time, for about 5 to 10 minutes.
Tip the bread salad back onto the serving platter. Drizzle and toss with a spoonful of the pan juices. Add the greens, a drizzle of vinaigrette, and fold well. Taste again.
Tilt the chicken roasting pan and skim the last of the fat. Place over medium-low heat, add any juice that has collected under the chicken, and bring to a simmer. Stir and scrape to soften any hard golden drippings. Taste — the juices will be extremely flavorful.
Cut the chicken into pieces, spread on top of the Bread Salad, if using. Yum-Yum EAT IT UP!!!!
